2013년 8월 22일 목요일

UDK Procedural Building System WIP

Procedural Building System -WIP-

The procedural Building System allows a designer to quickly and efficiently create a building with specified rule set. The rule set can be as simple as just couple of nodes. However, in order to make a building that looks like a real building, more specific commands will be required.

This picture demonstrates the what the rule sets are capable of doing. The rule set above tells the ProcBuilding brush to place a flat window mesh and 3-sided window mesh next to each other on the brush. The brush size is 1800x1800x1800. The meshes were 320 units and 160 units, so they repeated 9 times on the X-axis. Then I've wrote the ruleset to place the frieze in between the window meshes all the way from bottom of the building to the top.

This picture shows updated version of the rule set. Now there are rather respectable looking corner piece as well as store windows for the bottom floor. 

...More updates on the way...
-to be continued-

__________________________________________________________

In this update, there is an extra piece of mesh in between the straight window and 3-sided window. As a result, the rule set needed to be updated as well.
 
_________________________________________________________


The ruleset has been updated and close to being finalized for this particular project.
The rule set is capable of making irregular shaped buildings as well as rounded buildings.
The rule set has been created so that the user has the power to choose a wall that the user wants and make it a plain wall with no windows. More variations can be added as well.
 
___________________________________________________________________
(Aug 28,2013)
The proc building ruleset has been "finalized". It can never be quite finalized in my opinion.
 
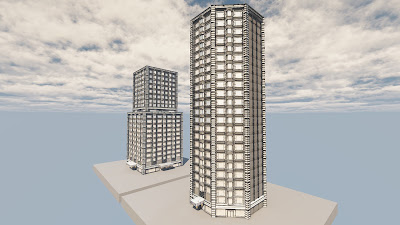
-Proc Building-
 
 
The rectangular building has 2 proc building brushes.
As the viewers can see the awning that is built on the ground floor can't be found in the top portion of the building. That is because there's a variation node in the rule set which allows the user to choose whether to have or not have awnings.
The different variations are better visible on the octagonal shaped building. All the three visible sides are constructed with different variations, which the users have control over.
 
-modular kit (tessellated)-

The buildings are made up of 9 to 12 pieces. There are two variations for each of the 3 frieze meshes(straight, 3-sided, large).
The uses has the freedom to make their buildings with only one of the 2 variations or both.
The big appeal for this assets are the snow effect on top of the meshes.
In order to give the snow more body, I've applied tessellation which adapt to the camera position. 

-proc building ruleset-

This represents roughly what my ruleset looks like. It is just matter of time before the ruleset gets many for variations and become extremely versatile.  


End notes:
The Proc Building system is a rather powerful system which allows the users to create buildings instantly. The buildings are instance of each other meaning it will use less performance power than as if the buildings were created individually by pieces. One "annoying" aspect of the proc building is that the numbers has to be precise. Otherwise, there will be lights visible between the cracks of the meshes, or there will be annoying z fighting.
 
This knowledge of making proc building will pay off when making a whole city environment such as Rockstar's GTA series or other open world games for that matter.
 
This project was a good project for me to learn new techniques. This particular project gave me opportunities to learn about procedural building system, tessellation, and substance designer 3.5.
Substance Designer 3.5 allows an artist to create textures from node based work flow. The pros and cons of Substance Designer is debatable because it is essentially UDK's material editor, but in another software.
But in my experience, it is easier to use and I had to freedom to just drag in another texture (which they call it Filter) to my current project and create cohesive materials for an asset. In addition, the normal, spec, curvature, world normal, etc. maps can be created in the software by importing a custom mesh. As a result, the artist may create individual, precise textures for the mesh. Not the mention, the user has the ability to paint straight on to the mesh which is not available in UDK.
The project create in Substance Designer 3.5 can be published, meaning saved so it is compatible in UDK, and bring it straight into UDK and be able to tweak numbers instantly like material instance.
 
The total hours spent on the project adds up to be approximately 50 hours. The total hours include modeling, texturing, proc building ruleset creation, tessellation, and brainstorming.


2013년 8월 21일 수요일

UDK material transition


UDK shader: Material transtion via matinee

This demo is strictly about demonstrating material transition via matinee sequence.

Two different textures were added into one material sequence. Then it was made into a material instance. Thus, I was able to control the behavior of the material via matinee using Float Material Param Track
As you can see, the kismet sequence is quite simple.
The analog input determines what button triggers the event. In my case, E and F were the keys to play and reverse the matinee sequence. 


BMW 135i model


Approximately 10 hours of modeling and texturing
Modeled in Maya 2012
Rendered in UDK

This was one of my favorite cars and I wanted to spend some time modeling it.
There had been several times where I came across a troubling situation due to making my geometry not clean. I ended up fixing some and some I had to delete and start fresh.


2013년 5월 7일 화요일

(UDK) Water Material Tutorial

UDK Water Material Tutorial

This tutorial is going to show you to how to make a water material similar to this water material.
The textures necessary for this tutorial can be downloaded from HERE
---------------------------------------------------------------------------------

First, we'll open up UDK to start the tutorial.
I used July 2012 version of UDK to create this tutorial.

 It is crucial that the UDK is in DX11 mode in order for the material to look like what it is in the video. The software will tell you that it will need to restart in order for the DX11 to work.

After you have changed the UDK from DX9 to DX11, we will quickly jump into Maya or 3dsMax to create a simple plane for where the material will be applied. In my case, I used Maya 2013 (it really doesn't matter).
For this tutorial, I created a plane 10 squares x 10 squares (I apologize for the image below).
They are 1024 units by 1024 units in width and height. And rotated 90degrees in x-axis so that it is perpendicular to the Z axis. I have set my maya settings so that Z is going up and down instead of Y axis.


Creating this plane is quite simple. Now we are ready to export it. But before exporting, I always like to do Edit > Freeze Transformation. Then export it to FBX file so that you can import it to UDK.
Now you may close Maya or 3dsMax, we won't be using it anymore for the rest of this tutorial.

Back in UDK, we'll now create a package. I named mine "waterTUT", you may name yours whatever you want. And then you will create a material. I named mine "WaterMat".

I strongly believe that naming assets specifically is a habit that everyone should get into. It may save precious time in the future.
After you've sucessfully created a material, import the plane as a static mesh and all the textures that are included in this tutorial. One normal map is from the UDK contents, it is T_UN_Liquid_BSP_SoftRiver_01_normal_b. It is included in the UDK itself.
And this will be a good place to SAVE your package. 
Now, we will create a map that will be used for reflection.


In the Content Browser page, there is a tab named Actor Classes. Under the Actor classes tab, go under Uncategorized and drag SceneCaptureCubeMapActor into the map. In the image, I was using DX9 instead of DX11. As a result, the sphere will be colored. However, when you use DX11, it will remain black. I believe it is a bug of some sort that Epic has not yet addressed at the time of making this tutorial. 


While the SceneCaptureCubeMapActor is selected, press F4 or go to its properties. 
Under the properties, we will change several items.
1. change the view mode to SceneCapView_Lit.
2. make Far Plane a great number. (I found pressing 9 for several seconds is a good method since it will automatically change the number to the max numeric value if the artist exceeds it)
3. check Enable Post Process and Enable Fog
***Please note that changing these setting will require more performance power than when it is at its original value.***
as I mentioned before, the sphere will change its color when those setting are altered in DX9 mode. 


Now, we will jump back into the content browser and create something called TextureRenderTargetCube by right-clicking on the empty space of content browser.

When this window pops up, we'll name it "reflection". You may name it anything you want.
And for the width, we'll change it to 1024. Also keep in mind that raising this value will have negative impact on the performance. However, higher value will give you higher resolution of the reflecting image. So you may need to tweak the value to fit your allowance and project.

When you press "Ok", you will now need to plug in the TextureRenderTargetCube to the SceneCaptureCubeMapActor. You may easily do that by just pressing the green button on the properties window that had been open the whole time.
Now you may want to SAVE your package and the map. The textureRenderTargetCube will NOT work when you use it in a different map; you will need to manually plug it into another CubeMapActor if you want it in other maps. 

Now that the package is saved, I will continue this tutorial by right clicking TextureRenderTargetCube and selecting "Create New Static Texture..." 
The software will compute the scene for couple of seconds. You might need to go into different package and return back for the static images to show, or refreshing the page could work.

***Please note that the different scene will give the water different colors***

When you've successfully created the static images, all the necessary components for the material has been collected. And all we have to do now is to create the material inside material editor. 

With this material it is CRUCIAL to change the Blend Mode to Translucent

We'll return back to the material we've created before and start the creation. The image most likely will speak for itself. I've multiplied (.0806, .162, .243) constant color to .25 constant. I played around with different values but I personally liked this color the best. 
Next, I grabbed CameraWorldPosition and Reflection Vector and multiplied it together. And they are plugged into texture sample (TextureCube was dragged into the editor from the content browser). 
Now the TextueCube is multiplied by .1 to tone it down and not make it look like a mirror. 
The Fresnel in the front will give the water a highlight. 


The SpecularPower is set to 55 (It may be changed to fit your project).
And the opacity is simply DepthBiasedAlpha with alpha of 1 and Bias Scale of 256. The bias scale will determine where the material will become opaque. And the alpha will determine how opaque the water is. So in this case, plugging value of 1 is unnecessary.


Next step is creating the specular map. The panners will move the image in X and Y direction to create the illusion of moving waves. The TextureCordinator will tile the image.
And the time node is unnecessary for panner and rotator as I found out. It is necessary for sine and cosine nodes though.
I used an image with colors to create the specular map and just desaturated it 100% to get black and white image. I also noticed by using this particular spec map as a distortion map, the result I got was enjoyable. 


After the Spec map has been created, Normal map is next. Just like the spec map, I created the normal by multiply the 2 different normal maps with different speeds together to create the illusion of the waves. 

when you see the material inside a map, it should look something like this:


You will notice that there are no bubbles near the edge of the water. Now, we will create that in the editor.

You do not have to create all the nodes. However, it is recommended so that the bubbles will also look lively next the waves. It uses the similar technique as the spec map and the normal map in the sense that it is moving textures combined into one by multiply node. You probably have noticed the DepthBiasedAlpha here as well. It will determine at what depth the bubbles will appear and where the cut off will be. 
You will need to combine the set of nodes in Diffuse bubble with the nodes for bubbles by ADDING these two sets of nodes. So in the end, it should look like this:

When you preview the bubbles in the editor, it should look more or less like the image below:

Now the bubbles will be created near the shallow parks of the water where the broken waves form bubbles. However, what bothers me is the sharp cutoff of the bubbles. It doesn't look organic to me. In order to fix that a little more work has to be done.


Addition of 7 more nodes will successfully get rid of the harsh edges of the bubbles. You will notice that the edges will become more broken and little more random than before. I personally prefer this look. 

Now the final step.
Until now, DX11 was not doing anything to make the material look great. However, this is where DX11 will shine. 
First we will create the nodes that will be used for World Displacement.


The only texture sample present in the image will act as the huge round waves that create the illusion so that the material behaves like a big body of water. You may experiment with different images for different effect. 


You will notice that the WorldDisplacement is not available for use. It is because UDK doesn't know that the artist wants to use that. So what we need to do is to let the software know that we are going to use it. The settings can be adjusted under the D3D11 tab. What you need to do is change the D3D11 Tessellation Mode to PNTriangles and enable crack free displacement. That will allow you to plug in the nodes to the World Displacement.


I have not gone in depth with tessellation in this particular tutorial. But it is unwise to leave the tessellation as is. The artist should create series of nodes to tell the UDK to only tessellate the meshes near the camera or at designated distance. Otherwise, the performance requirement will be outrageous. 

Now you have successfully created the water material.


Thank you for reading my tutorial and I hope this had been a help.
-minimin0425-
_________________________________________________________________________________
Full node screenshot

Below are the screenshots of the full node system. It is color coded and clearly labeled. 
I hope this helps. Thank you for using my tutorial.


Below are the detailed view of the node system.
They are color coded, so it will be easy for you to see which one it is zooming into.


2013년 3월 31일 일요일

Interactive Particle System UDK -tutorial-


Interactive Particle System in UDK


This tutorial is going to guide you to the first stage of making particles in UDK interact by using force. Please keep in mind that this tutorial is about getting you started on making a particle system interact with forces. I have no intention to making it look pretty. Making it look presentable or making it fit your project is your duty.

First we will create a quick and very simple dot for the particle system that we will be creating in the UDK game engine. 
***note that any particle system can be used. You may skip this part where I will be going to show how to make a quick particle system if you desire. Skip down to where you see a cut line that tells you to start at if you have a particle system prepared***


First, using Adobe Photoshop (in my case CS6), create a document with size of 256x256 pixels at 72 dpi. I've seen some people use 150 or 300 dpi. But I don't see the reason to go up that high since 72 dpi is good enough.


Then create an alpha channel. I personally like to use Gradient Tool with radial gradient. I chose the color going from white to transparent. To create a sphere, I start from the centre of the canvas and go out to where I feel is appropriate. 
I won't be drawing anything in the RGB channels for this tutorial.


If you followed my technique, you should have gotten similar result. Some people like to just get a soft edge round brush and click on the canvas. That maybe faster, but I like to create my alpha channel this way. 

Save your file as Targa or TGA. (they are the samething)

Choose 32 bits/pixel. This must be chosen, otherwise, no alpha map will be saved to the TGA file. 


Inside UDK, the first step is to create a package to where everything will be saved. Then create a Material (in my case, I named it dotMAT). And then import the Dot texture you've made in photoshop.


After you've successfully created a material, follow my steps as shown on the picture above. 
It is very important that you change the blend mode to ADDITIVE
I also chose Two sided, if you were wondering. This will allow the player to see the texture even if the player is on the other side of the material.
The VertexColor is used to change the color of the dot in the cascade. However I won't be changing colors in this tutorial so it wasn't necessary for me to use it.
============================================
Now will be a good time to save your package if you haven't done so.
============================================


Now we'll create a new particle system by right clicking on the content browser.


In the cascade (UDK term for particle system editor), plug in the dot material as shown in the picture above. 
This is where you can get creative. 
Cascade is powerful tool that allows the user to create whatever particle system they want to create. You may find helpful tools online to creating good looking particle systems. 

The only thing I changed in the cascade is the life time. Min= 5 seconds Max= 10 seconds.

---------------------------------------------------------------------------------
[cut line]
Start here if you have a particle system prepared.

This is the crucial part of making particles interact with forces.

In cascade, right click on the particle and under "Type Data", choose PhysX Sprite Data.


Now, in the content browser, you need to create a "New PhysXParticleSystem" This will control the particle behavior as it interacts with forces that are applied on to them. 


In order to apply the physx particle system to the particle system, click PhysX Sprite Data inside Cascade and plug in the physX particle system. 


For tutorial purposes, I've disabled the gravity inside the PhysX particle system properties. You may leave it On or Off as you feel is necessary for your project(s).
There are many settings that the artist can change to make the particle better fit the environment in which it will be used in.


Now that I've placed the particle inside the UDK default map, you can see that it is behaving as it would normally. 


This is where the fun begins. Inside the content browser, under Actor Classes, there is "Physics" tab. In this tutorial, I will be using NxForceFieldRadial. I believe the particle should interact with all the forces that are inside the content browser. (I haven't tried it though).


A very important thing to do is designate the shape of the force field. In my case, I used radial shape. And you would need to change the Force Strength according to whatever strength you feel is appropriate. In my case, I used 25. 

A positive value of the force will make the particles go away from the force
A negative value of the force will make the particles go toward the force

Now if you jump into the game, the particle should be moving due to the force. 
Now you have successfully made particle interacting with forces in UDK. 

Remember to SAVE!!
---------------------------------------------------------------------------------
Further notes. 
The forces may be controlled using kismet. A very simple setup of toggle-able force in kismet would be: 
 When a player presses "E" near the trigger, the force will be turned off. And pressing "E" again will turn it on again. If the artist desire to attach the trigger to the player so the player can toggle the force wherever they want. The picture below is the kismet script for doing that.
As you have learned, through kismet, the artist can give the players power to control the force. A video example is shown below.


This video has been created using the method I've shown in the tutorial.

And the kismet looks something like this:

The toggle turns the force on and off. And the matinee controls when and where the force is turned on and off. 

Thank you for reading my tutorial on how to make particles in UDK interact with forces.

-minimin0425-